The Enterprise Manager Diagnostics Kit, (EMDIAG) is a great addition to have installed and be familiar with on your Enterprise Manager 12c, (EM12c) environment BEFORE you need it. There are three main kits:
- repvfy – Extracts data from the Grid Control or DB Control Repository to help you to maintain or diagnose problems in your Grid Control or DB Control.
The repvfy Kit is partly included in the Cloud Control 12C Support Workbench for the OMS. - agtvfy Kit – A set of command lines to help you to maintain and diagnose problems in your Cloud Control, Grid Control or DB Control Management Agents.
- omsvfy Kit – A set of command lines to help you to maintain and diagnose problems in your Cloud Control, Grid Control or DB Control Management Services.
For this post, we are going to work with the REPVFY kit from the EMDIAG and explore how functional this kit can be to diagnose and assist when issues arise in the EM12c OMS.
Installing the EM Diagnostics Kit
Download the zip file for the version that you need, per Oracle Support Note: MOS ID# 421053.1
This note will explain about each of the kits and take you through the download process.
Create the EMDIAG_HOME in the environment variables for the OMS OS User and owner of the EM12c. This will create an easier support scenario for the administrator in time of stress when they require quick access to the EMDIAG tools.
unzip the EMDIAG zip file into the EMDIAG directory
unzip <file name> -d $ORACLE_HOME/emdiag
Perform the installation by changing to the newly created directory and installing EMDIAG
cd to the EMDIAG home, (that new directory you just unzipped the files into…)
cd $EMDIAG_HOME/bin
In the bin directory will be three common files, the executable, the batch file for windows support and the perl script that supports both:
-rwxrwxr-- 1 oracle dba 3331 Feb 23 2012 repvfy.bat
-rwxrwxr-- 1 oracle dba 198800 Aug 31 18:57 repvfy.pl
-rwxrwxr-x 1 oracle dba 7195 Aug 31 18:57 repvfy
./repvfy install -tns em12rep -pwd password
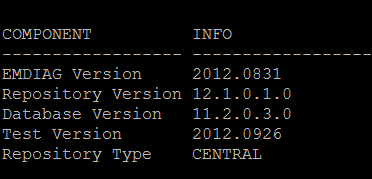
The installation will commence and you will end with the following:
PL/SQL procedure successfully completed.
COMPONENT            INFO
 -------------------- --------------------
 EMDIAG Version       2012.0831
 Repository Version   12.1.0.1.0
 Database Version     11.2.0.3.0
 Test Version         2012.0926
 Repository Type      CENTRAL
 Verify Tests         381
 Object Tests         157
 Deployment           SMALL
Checking the installation and verification of the version
./repvfy version -tns em12rep version
Please enter the SYSMAN password when prompted.
Component                      Version
 ------------------------------ ---------------
 repvfy                               2012.0831
 EMDIAG                                   12cR1
 Database                            11.2.0.3.0
 Repository                          12.1.0.1.0
 Tests                                2012.0926
 Linux                                   2.6.18
 x86_64-linux-thread-mult
 PERL                                    5.10.0
 SQL*Plus                            11.2.0.3.0
 Agent Zip                                  3.0
 Agent Unzip                               6.00
 ------------------------------ ---------------
Using the EM Diagnostics REPVFY KIT
Querying the following data from the Enterprise Manager will gather data that is required to then run the diagnostics for job level reports. The example used will involve a backup job for APEX:
From SQL*Plus as a user with select privileges to the SYSMAN schema:
select mj.job_id, mj.job_name, mjh.execution_id, mjh.step_id
from sysman.mgmt_job mj, sysman.mgmt_job_history mjh
where mj.job_id = 'BFC78F41009876F3E04014AC08003231'
and mj.job_id=mjh.job_id
and mjh.start_time > sysdate-1;
Using the job name, “BACKUP_APEX.1”, an obvious APEX backup job, we can perform some diagnostics report gathering on the job itself, using the job_name field. Due to the amount of diagnostic data that is offered, redirecting the output to a file is recommended.
cd $EMDIAG_HOME/bin
./repvfy dump job -name BACKUP_APEX.1 –pwd password -tns em12rep > ./rep_apex_job.lst
The output file will then show you a full report on the job, starting with the information about the diagnostic tool, the database, test and repository.
From here, the report steps into information about the job- run time, timezone and detail information:
You can view the parameters in the job, including multi-step jobs commands:
This report will also tell you about where the job runs from and the target it runs to:
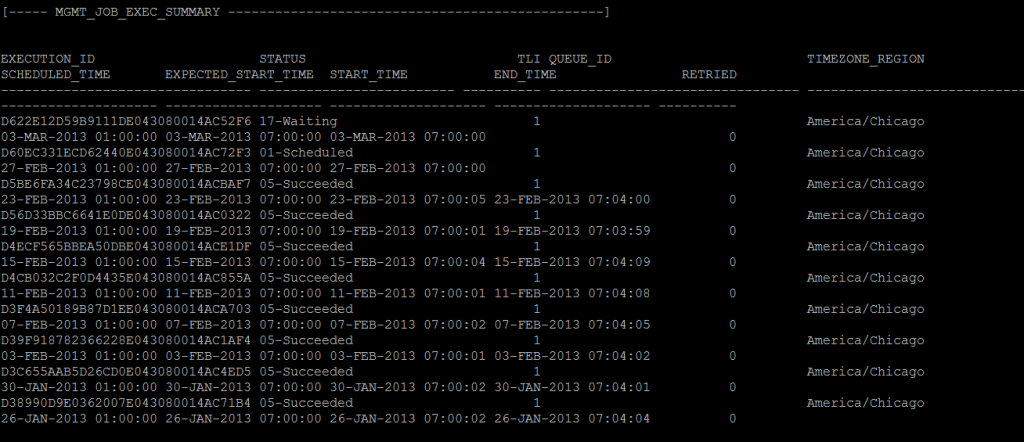
The next section then let you know who owns the job and who has grants, along with what kind of grants on the job. As this job is simply owned and run by the SYSMAN user only, only this user shows in the report. The report presents the last 10 run times in history, including elapsed time, retries and success information.
For the example, the EMDIAG informs me that there is one job that was in a waiting state. In the recent history, it shows that all have been successful, (0), but that a level 17, signifies that one of the runs did have to wait due to some undisclosed issue that isn’t shown in the execution summary:
If there were any errors in the job analysis, this is saved for the last section of the report. Our example compiled successfully, showed no issues and so the output results in the following:
If a job has more than one step and you wish to gather detailed diagnostic information about that step ONLY, a secondary report can be generated by running the following:
./repvfy dump –tns <oms_sid> step –id <step_id>
GUID Target Diagnostics
For our next scenario, we are going to utilize the GUID for our EM12rep, (the OMS Repository for the EM12c) and gather EM environment data:
./repvfy dump -tns <oms_sid> execution -guid EFD92E6468B02696B602A650E085B5A9 -pwd <pwd> > ./rep_guid.lst
By running the GUID level command, (GUID is your target GUID and dumps out information on all the jobs, from all the targets)you get a one-stop shop kind of diagnostic report about your EM Jobs Service health.
Although the report starts out very similar to the job level report, listing out repository and EM information, once you get to target info, you will note a distinct difference, as this report will list out all information regarding monitored targets, which the job level report did not.
If there are any background jobs submitted by the EM Jobs Service that are experiencing issues, they are clearly reported in their own section:
My only complaint at this time, would be that the BP1 version of the EM12c, when the EMDIAG is run against it at a full enironment level, experiences an error at the Job Analysis Summary step:
Due to this, if you are still on a BP1 version and need to pull this level of diagnostic data, I hope that you have your issue narrowed down to a single job or target that you can focus the report to, subsequently avoiding this error.
Global Diagnostics
In this example, we will run a level 9 diagnostic, which will run a report against the whole of the Enterprise Manager environment, checking the health and for issues:
./repvfy -tns em12rep verify -level 9 –detail
The first thing this level of diagnostic does is check the version of EMDIAG you are using and if there is a newer version available. The diagnostics will proceed to perform a full verification of the EM environment before logging in to SQL Plus to perform the secondary diagnostics on the EM testing, the installation information about the EM system and then proceed onto internal jobs and alerts from the EM environment.
The next step is to check all promoted and un-promoted targets, make recommendations on changes and then end the report by verifying any non-standard EM users.
The logs for the output from these reports will then be generated to the <EMDIAG_HOME>/log directory to be reviewed or uploaded to Oracle Support. I do prefer to redirect the screen output to a file for easy review, as seen in my examples above. This data should assist the administrator in answering questions regarding their EM12c environment without having to always open an SR, but if the need arises, this valuable diagnostic data can then be generated to save time and effort so that the administrator can perform other tasks than just answering Oracle Support questions.


3 Comments on “Using the EM Diagnostic REPVFY Kit with EM12c”
Comments are closed.