Now that I’ve loaded a ton of transactions and did a bunch of work load on my source database with the SH sample schema and Swingbench, I’ve noted how little impact to the databases using different cloud tools, (which will come in a few later posts) now I’m going to show you how easy it is to create a new VDB from all of this, WITH the new SH data included. During all of this time, the primary users of my Delphix VDB, (virtualized databases) would have been working in the previous iage, but someone wants that new SH schema now that my testing has completed.
To do this, I open up my Delphix admin console, (using the IP address for the Delphix Engine from the AWS Trail build output), log in as delphix_admin and open up the Source group to access the Employee Oracle 11g database, (aka ORCL.)
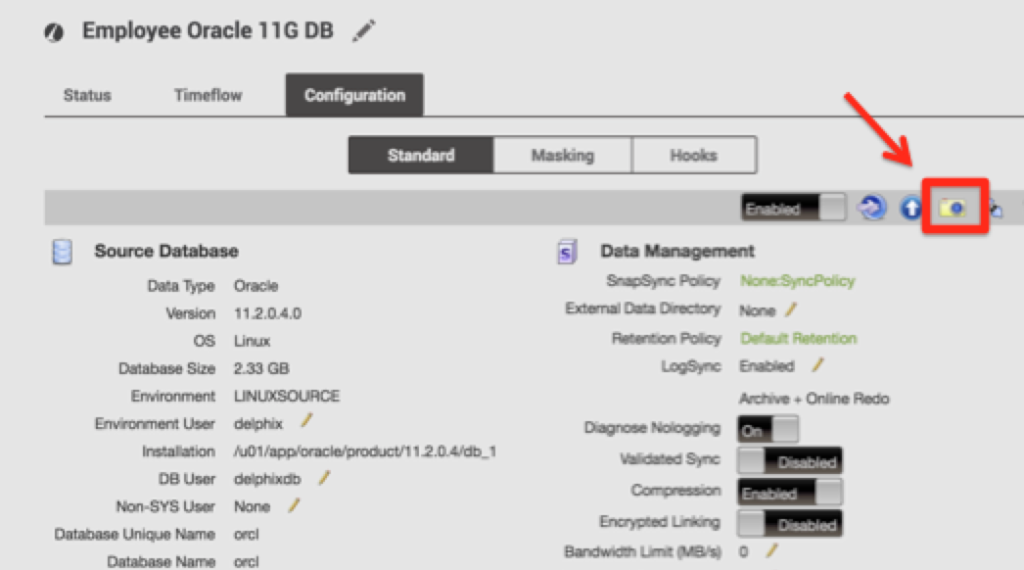
I know my new load is complete on the ORCL database and need to take a new snapshot to update the Delphix Engine outside of the standard refresh interval, (I’m set at the default of every 24 hrs.) Access this by clicking on the Configuration tab and to take a snapshot, I simply click on the camera icon.
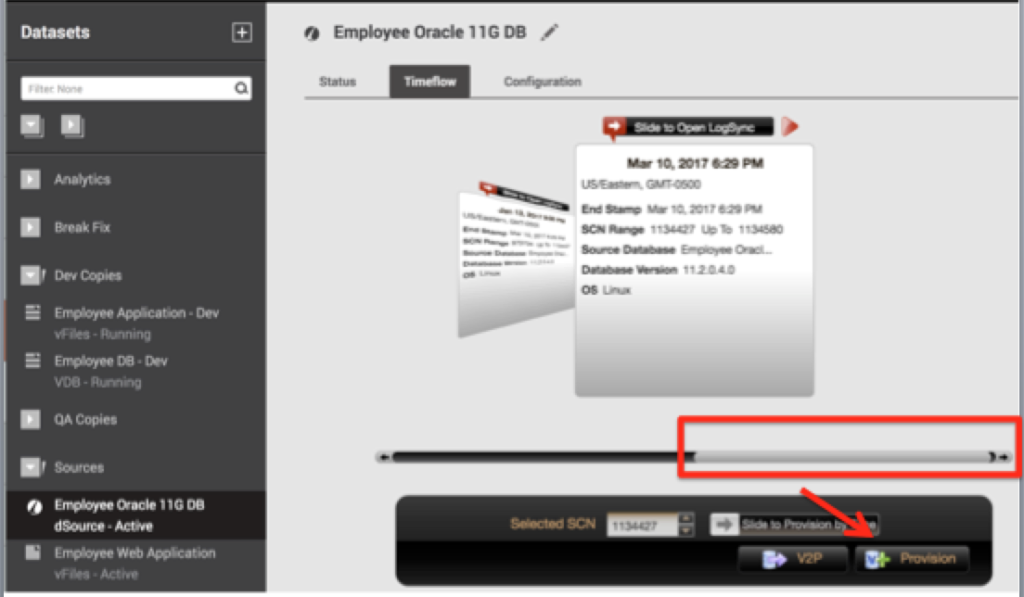
A snapshot will take a couple seconds, as this is a very, very small database, (2.3G) and then you can click on Timeflow to view the new snapshot available for use. Ensure the new snapshot is chosen by moving the slider all the way to the right and look at the timestamp, ensuring it’s the latest, matching your recent one.
Click on Provision and it will default to the Source host, change to the target, update to a new, preferred database name, (if you don’t like the default) and then you may have to scroll down to see the Next button to go through the subsequent steps in the wizard. I know my Macbook has a smaller screen and I do have to scroll to see the Next button. After you’ve made any other changes, click on Finish and let the job run. Don’t be surprised by the speed that a VDB is provisioned- I know it’s really fast, but it really did create a new VDB!
Now that we have it, let’s connect to it from SQL*Plus and check prove that we got the new SH schema over.
Using the IP Address for the Linux Target that was given to use in our AWS Trial build, let’s connect:
ssh delphix@<linuxtarget IP Address>
Did you really just create a whole new VDB?
[delphix@linuxtarget ~]$ ps -ef | grep pmon
delphix   1148  1131  0 18:57 pts/0    00:00:00 grep pmon
delphix  16825     1  0 Mar09 ?        00:00:06 ora_pmon_devdb
delphix  16848     1  0 Mar09 ?        00:00:06 ora_pmon_qadb
delphix  31479     1  0 18:30 ?        00:00:00 ora_pmon_VEmp6C0
Yep, there it is…
Now let’s connect to it.
Set our environment:
. 11g.env
Set the ORACLE_SID to the new VDB
export ORACLE_SID=VEmp6C0
Connect to SQL*Plus as our SH user using the password used in our creation on the source database, ORCL:
$ sqlplus sh

Enter password:
Connected to:
Oracle Database 11g Enterprise Edition Release 11.2.0.4.0 - 64bit Production
With the Partitioning, OLAP, Data Mining and Real Application Testing options

SQL> select object_type, count(*) from user_objects
  2  group by object_type;

OBJECT_TYPE       COUNT(*)

------------------- ----------
INDEX PARTITION     196
TABLE PARTITION     56
LOB                 2
DIMENSION           5
MATERIALIZED VIEW   2
INDEX               30
VIEW                1
TABLE               16

8 rows selected.

SQL> select table_name, sum(num_rows) from user_tab_statistics
  2  where table_name not like 'DR$%'
  3  group by table_name
  4  order by table_name;

TABLE_NAME       SUM(NUM_ROWS)

------------------------------ -------------
CAL_MONTH_SALES_MV             48
CHANNELS                       5
COSTS                          164224
COUNTRIES                      23
CUSTOMERS                      55500
FWEEK_PSCAT_SALES_MV           11266
PRODUCTS                       72
PROMOTIONS                     503
SALES                          1837686
SALES_TRANSACTIONS_EXT         916039
SUPPLEMENTARY_DEMOGRAPHICS     4500
TIMES                          1826

12 rows selected.
Well, lookie there, the same as the source database we loaded earlier... 🙂 Next, we’ll go into the stuff that always gets my interest- performance data, the cloud and visualization tools.


