I had a customer who needed to know how to retain performance after migrating to the cloud for SQL execution and I recommended SQL Baselines, but the information was surprisingly missing on how to collect an AWR baseline, THEN export out baselines and post migration, start a import baselines and review performance.

Goal
To stabilize performance of Oracle database during migrations to new Azure infrastructure from on-premises environments. Oracle provides in 12c and above, the ability to create full management baselines of SQL executions, which are a combination of SQL profiles, hints and defined statistical data to ensure performance remains consistent across Oracle databases for one or all SQL executions in any database, for any identified SQL ID. This process is the recommended practice for ensuring stability due to database migration, recovery and other scenarios where significant database changes might dynamically change performance.
Steps
- Collect Baseline AWR performance data to ensure execution times for top SQL are identified.
- Collect SQL baselines and execution requirements at the database level.
- Build out new environment and migrate to it.
- Import the baselines into the new database.
- Test and validate the new AWR performance shows similar execution times to previous on-premises environment.
There are numerous AWR reports that can be used for optimization and baseline reporting.
Generating Various Types of AWR Reports
AWR reports can be generated by running various SQL scripts to satisfy various requirements. Each report is available in HTML or TXT format:
- awrrpt.sql: Displays various statistics for a range of snapshots Ids. This is the standard report and the awrgrpt.sql is the RAC aware version of the standard report.
- awrrpti.sql: Displays statistics for a range of snapshot Ids on a specified database and instance.
- awrsqrpt.sql: Displays statistics of a particular SQL statement for a range of snapshot Ids. Run this report to inspect or debug the performance of a particular SQL statement.
- awrsqrpi.sql: Displays statistics of a particular SQL statement for a range of snapshot Ids on a specified database and instance.
- awrddrpt.sql: Compares detailed performance attributes and configuration settings between two selected time periods.
- awrddrpi.sql: Compares detailed performance attributes and configuration settings between two selected time periods on a specific database and instance.
- ashrpt.sql: Active session history report, used to collect sample reporting and performance data for a small amount of time. This report should never be used for execution counts but provides great insight into performance issues at a granular level.
To create an overall snapshot used for a baseline, the awrrpt.sql is the standard report that is used, and a preference will be to have the HTML report, especially if 12.2 or above database version. There is additional content included in the HTML version that isn’t included in the TEXT version of the report.
AWR Retention
Baselines are only as good as the amount of data retained in the Automatic Workload Repository. Recommended practice is to extend the AWR retention to the max of the migration cycle or 60 days, whichever is greater. Note that over 60 days of AWR data can put additional load on the production system of <5. This additional load may seem low, but it is important to note that it may occur.
To adjust the retention period, perform the following:
How to Modify the AWR SNAPSHOT SETTINGS:
BEGIN
  DBMS_WORKLOAD_REPOSITORY.modify_snapshot_settings(
    retention => 86400,        -- Minutes (86400 = 60 Days).
                               -- Current value retained if NULL.
    interval  => 60);          -- Minutes. Current value retained if NULL.
END;
/
The above example is to update the retention of the AWR to 60 days.
Take Baseline AWR
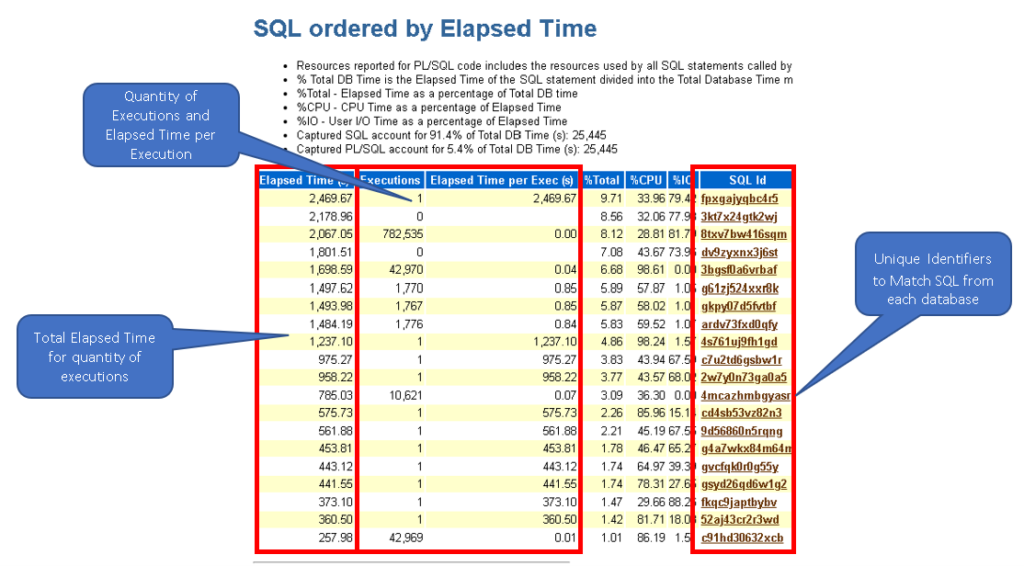
This AWR report needs to cover significant database activity- 4-7 days is the recommended coverage time, as well as one for peak workload on smaller snapshot intervals, (60 minutes where all executions are completed at least once in the “Top SQL by Elapsed Time”.
EXEC DBMS_WORKLOAD_REPOSITORY.CREATE_SNAPSHOT;
Check for the snapshot and run the report, as well as retain for future reference. This is your baseline that will be used to compare to the target database performance.
SELECT *
FROM   (SELECT SNAP_ID, SNAP_LEVEL,
               TO_CHAR(BEGIN_INTERVAL_TIME, 'DD/MM/YY HH24:MI:SS') BEGIN
        FROM   DBA_HIST_SNAPSHOT
        ORDER BY SNAP_ID DESC)
WHERE   ROWNUM <= 3;


   SNAP_ID SNAP_LEVEL BEGIN
---------- ---------- -----------------
       213         1 10/12/22 06:34:19
       379         1 10/19/22 06:01:23
The example above demonstrated snapshots ranging for 166, (7 days/1 week) variance, which allows for a large swath of workload to be reviewed and captured. This will be the baseline to compare average execution times for Top SQL by Elapsed Time and other wait events/metrics.
Configure Database for Baseline Creation
The source database requires setup to create baselines and then a staging table to export the baselines to, which can then be imported into the new, target database.
Check the current settings on the source database:
SHOW PARAMETER SQL_PLAN;
Ensure the following parameter is set to true: optimizer_capture_sql_plan_baselines
ALTER SYSTEM SET OPTIMIZER_CAPTURE_SQL_PLAN_BASELINES = true;
Capture the baselines for the user schemas needed to ensure consistent performance. Recommended practices for a new database, is to collect baselines for all schemas that have user SQL:
EXEC DBMS_SPM.CONFIGURE(‘AUTO_CAPTURE_PARSING_SCHEMA_NAME’,’APP1′,true);
EXEC DBMS_SPM.CONFIGURE(‘AUTO_CAPTURE_PARSING_SCHEMA_NAME’,’USER1′,true);
Once all schemas have been added and any exclusions, check the baseline configuration:
COL PARAMETER_NAME FORMAT a32
COL PARAMETER_VALUE FORMAT a32

SELECT PARAMETER_NAME, PARAMETER_VALUE
FROM   DBA_SQL_MANAGEMENT_CONFIG
WHERE  PARAMETER_NAME LIKE '%AUTO_CAPTURE%';
Baseline Creation
To create SQL plan baselines, there are a few steps, but take the time to perform these steps in OEM, (Cloud Control) and it’s much easier:
- On the SQL Performance Analyzer Task Result page, under Recommendations, click on Create SQL Plan Baselines.
The Create SQL Plan Baselines page will appear to take you through the setup. Once collections occur, the regressed SQL statements section lists the regressed SQL statements that will be associated with the new SQL plan baselines.
- Under the Job Parameters, specify the parameters for the job:
-
- In the Job Name field, enter a name for the job.
- In the Description field, optionally enter a description for the job.
- Under Schedule, select the following:
-
- Click on Immediately to start the job now.
- Click on Later to schedule the job to start at a time specified using the Time Zone, Date, and Time fields.
- Remember to click on OK to save the job.
Once complete, the SQL Performance Analyzer Task Results page will then show up. Verify that a message is displayed to inform you that the job has been submitted successfully.
Export to a Staging Table
To export the baselines from a source database to be used in a target database, a staging table must be created to host the data. Connect to the source database as a privileged user and run the following command:
BEGIN
  DBMS_SPM.CREATE_STGTAB_BASELINE (
    table_name => 'stage_tb1_<dbname>');
END;
/
Adding the database name to the staging table name will help to eliminate confusion in any multiple database migrations involving baselines.
Export the baseline data to the staging table:
DECLARE
  v_plan_cnt NUMBER;
BEGIN
  v_plan_cnt := DBMS_SPM.PACK_STGTAB_BASELINE (
    table_name => 'stage_tbl_<dbname>'
,   enabled    => 'yes'
,   creator    => 'spm'
);
END;
/
Export the table from the source database using Oracle Data Pump and copy the Export dump file from the Source database host to the new target database VM.
Import to New Database
Copy the Data Pump dump file to a location on the target database host that Oracle has rights to. Use Oracle Data Pump to import the table into the target database. Now unpack the baselines to implement them for use by the new database.
DECLARE
  v_plan_cnt NUMBER;
BEGIN
  v_plan_cnt := DBMS_SPM.UNPACK_STGTAB_BASELINE (
    table_name => 'stage_tbl_<dbname>'
,   fixed      => 'yes'
);
END;
/
Take a manual AWR snapshot to provide a clean performance review window to begin from:
EXEC DBMS_WORKLOAD_REPOSITORY.CREATE_SNAPSHOT;
Check the snapshot number and retain this number for the beginning SNAP_ID for the comparison which will be done against the original AWR.
Post production runs and full testing, execute an AWR report:
@$ORACLE_HOME/rdbms/admin/awrrpt.sql;
Beginning_SNAPID = Snapshot ID created in the command above.
Ending SNAPID: Most Recent Snapshot ID in target database.
Comparing Performance
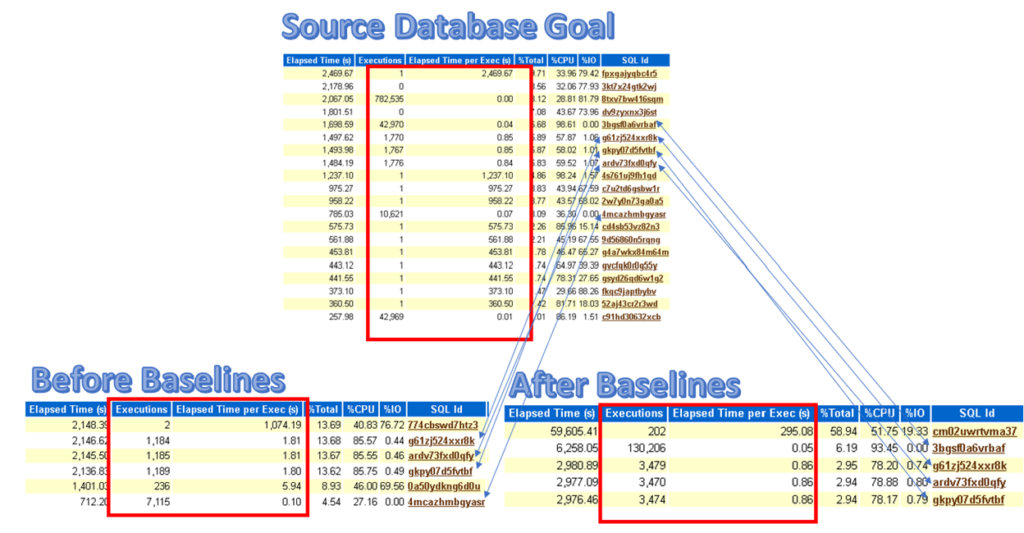
Using the two AWR reports, note the difference in elapsed time on the reports, as well as the DBTime.

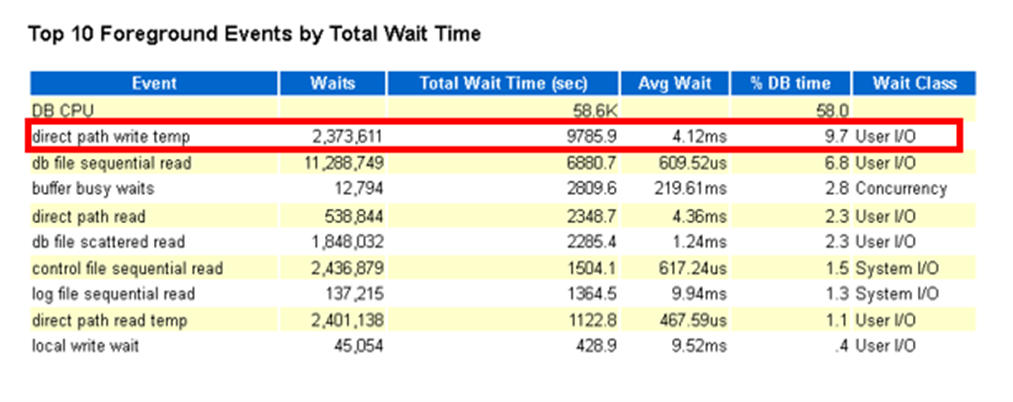
Check the Top Foreground Events by Wait Time to verify that there isn’t an outlier issue, outside of any SQL plan differences.

Using the Source Database Elapsed Time per Execution as a goal, compare the difference in execution elapsed time between the before baselines and after baselines:

With baselines in place, the plans should now be the same and performance should be similar. If there is still differences to be seen, inspect the overall wait events, especially IO and network waits.
Disabling Baseline Collection
To turn off the baselines in any database, just update the parameter for the capture to false:
SQL> ALTER SYSTEM SET OPTIMIZER_USE_SQL_PLAN_BASELINES=false;
Automating Baselines
All SQL shown in the following steps can be automated in scripts:
- Turning on Baselines
- Creation of Baseline staging table
- Export of Baseline staging table
- SCP/SFTP of staging table to new environment.
- Import of Staging table and import of Baselines
Reference Docs
How to Generate an AWR Report and Create Baselines (oracle.com)
Migrating sql baselines from one database to another DBACLASS


One comment on “Stabilizing Migrations to the Cloud with SQL Baselines”
Comments are closed.