
Re-Adding a Database to the AWR Warehouse Without Losing Historical Snapshots
There may be a reason that one needs to re-add a database to the AWR Warehouse. This is a new opportunity for me to learn and offer assistance, but I’m working off the grid to figure out a solution. Luckily, it’s just a matter of creating a new process from pre-existing code and processes.
The process requires both the AWR Warehouse UI and a SQLPlus connection.
1. Disable the snapshots
2. Extract the AWR for the Database
3. Drop the database from the AWR Warehouse
4. Add the database back into the AWR Warehouse with the retention time or any other configuration change.
5. Update the configuration table in the source database to show the correct snapshots.
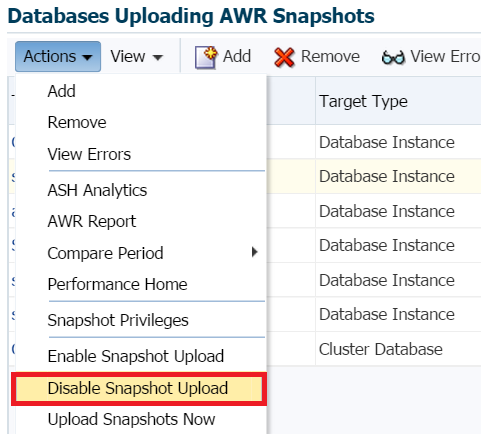
Disable Snapshot Uploads
Log into the AWR Warehouse console and locate the database that needs to be re-added:

From the AWR Warehouse UI, click on the database and then choose to disable the snapshot uploads for the database in question.
Extract AWR Data for the Database
From the AWR Warehouse host, log into the AWR Warehouse repository, (database) and now extract the AWR data. This will use the formal AWR data extract procedure, found in the $ORACLE_HOME/rdbms/admin directory and yes, it works with the AWR Warehouse.
~~~~~~~~~~~~~
AWR EXTRACT
~~~~~~~~~~~~~
~~~~~~~~~~~~~~~~~~~~~~~~~~~~~~~~~~~~~~~~~~~~~~~~~~~~~~~~~~~~~~~~~~~~
~ This script will extract the AWR data for a range of snapshots ~
~ into a dump file. The script will prompt users for the ~
~ following information: ~
~ (1) database id ~
~ (2) snapshot range to extract ~
~ (3) name of directory object ~
~ (4) name of dump file ~
~~~~~~~~~~~~~~~~~~~~~~~~~~~~~~~~~~~~~~~~~~~~~~~~~~~~~~~~~~~~~~~~~~~~
SQL> @$ORACLE_HOME/rdbms/admin/awrextr.sql;
A list of databases will be displayed that you can choose from. In the AWR Warehouse, all the source databases will be shown:
Databases in this Workload Repository schema
~~~~~~~~~~~~~~~~~~~~~~~~~~~~~~~~~~~~~~~~~~~~
DB Id DB Name Host
------------ ------------ ------------
* 1027807260 AWRWHSE AWRWHSE_HOST
9352681 APPSB1 HOST1
4212609618 AASDB  HOST2
4212608695 AASDB HOST3
so on and so forth....
Enter in the DBID for the database from the list. We’ll use the first AASDB from the list for our example:
Enter value for dbid: 4212607231
Using 4212607231 for Database ID
Specify the number of days of snapshots to choose from
~~~~~~~~~~~~~~~~~~~~~~~~~~~~~~~~~~~~~~~~~~~~~~~~~~~~~~
Entering the number of days (n) will result in the most recent
(n) days of snapshots being listed. Pressing <return> without
specifying a number lists all completed snapshots.
Enter value for num_days:
Listing all Completed Snapshots
As I didn’t enter a number in for the number of days, you can see I want ALL of the AWR data for this database. Now the extract script will ask for snapshot information. Again, we want all of it and the report will show us all of the snapshots. If there are so many, that you can’t see the first one, use the AWR Warehouse UI to see the first and last snapshot for this step.
Specify the Begin and End Snapshot Ids
~~~~~~~~~~~~~~~~~~~~~~~~~~~~~~~~~~~~~~
Enter value for begin_snap: 1777
Begin Snapshot Id specified: 1777

Enter value for end_snap: 2303
End Snapshot Id specified: 2303
Specify the Directory Name
~~~~~~~~~~~~~~~~~~~~~~~~~~
Directory Name Directory Path
------------------------------ -----------------------------------
DATA_PUMP_DIR /u01/admin/AWRWHSE/dpdump/
OPATCH_INST_DIR /u01/home/oracle/12.1.0.2/OPatch
OPATCH_LOG_DIR /u01/home/oracle/12.1.0.2/QOpatch
OPATCH_SCRIPT_DIR /u01/home/oracle/12.1.0.2/QOpatch

Choose a Directory Name from the above list (case-sensitive).
Enter value for directory_name: DATA_PUMP_DIR
Using the dump directory: DATA_PUMP_DIR
Specify the Name of the Extract Dump File
~~~~~~~~~~~~~~~~~~~~~~~~~~~~~~~~~~~~~~~~~
The prefix for the default dump file name is awrdat_1777_2303.
To use this name, press <return> to continue, otherwise enter
an alternative.
Enter value for file_name: awrw_AASDB
Using the dump file prefix: awrw_AASDB
End of AWR Extract
SQL> !ls -la /u01/admin/AWRWHSE/dpdump/awrw_AASDB.dmp
-rw-r----- 1 oracle oinstall 268779520 May 4 16:49 /u01/admin/AWRWHSE/dpdump/awrw_AASDB.dmp
Now that the extract is completed and the data is safe, it’s time to return to the AWR Warehouse console.
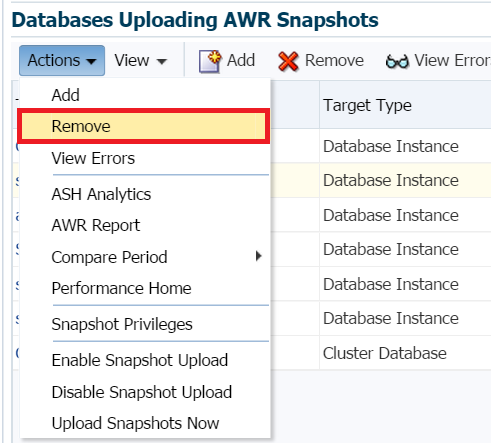
Remove the Database from the AWR Warehouse
Click on the database in the AWR Warehouse and choose to remove it from the repository.
Once the database has been removed, go through the proper steps to add it again to the AWR Warehouse. Once added, disable the upload of snapshots. This will keep from concurrency issues and other issues until we’re finished.
Reload the AWR Data
Log back into the AWR Warehouse Repository database, it’s time to load the data back into the AWR Warehouse.
$ORACLE_HOME/rdbms/admin/awrload.sql;
Specify the Name of the Dump File to Load
~~~~~~~~~~~~~~~~~~~~~~~~~~~~~~~~~~~~~~~~~
Please specify the prefix of the dump file (.dmp) to load: /u01/admin/AWRWHSE/dpdump/awrw_AASDB.dmp
Pressing  will result in the recommended default
tablespace (identified by *) being used.

Enter value for default_tablespace: MGMT_TABLESPACE
As the space will be used at some point anyway, (the mgmt_tablespace is expected to grow, so no concern here and the temporary user utilized for the process will be dropped at the end.
Choose to use the standard TEMP tablespace and proceed forward past this step. As the AWR objects are already built into the MGMT_TABLESPACE, there is no need to remap from the SYSAUX as the process in a standard database would require.
Processing object type TABLE_EXPORT/TABLE/TABLE_DATA
. . imported "AWR_STAGE"."WRH$_SQL_PLAN"                 89.485 MB   329981 rows
. . imported "AWR_STAGE"."WRH$_SQLTEXT"                  192.34 MB    398276 rows
. . imported "AWR_STAGE"."WRH$_SYSMETRIC_SUMMARY"        232.12 KB    1129472 rows
.......
........
	Append Data for "AWR_STAGE".WRH$_SGASTAT.
INSERT /*+ APPEND */ INTO SYS.WRH$_SGASTAT (SNAP_ID, DBID, INSTANCE_NUMBER, NAME, POOL, BYTES) SELECT SNAP_ID,
3228342000, INSTANCE_NUMBER, NAME, POOL, BYTES FROM "AWR_STAGE".WRH$_SGASTAT WHERE DBID = :c_dbid
Update Metadata Table
Now that we’ve loaded the data back in, we need to update the metadata table to show that more than the initial data exists.
select * from dbnsmp.caw_load_metadata
where dbid=<dbid for database in question>;
aasdb3 oracle_database 4212607231 1777 1778
27-APR-15 27-APR-15 3 1
Update the table to reflect the new data, as there should only be one upload max that’s been sent over. If there is more than one, you’ll need to change the update statement to just reflect the one row that shows the max(end_snap_id) as the AWR Warehouse loads from the lowest snapid to the most recent.
select * from dbsnmp.caw_load_metadata
where dbid=421607231;
Update dbsnmp.caw_load_metadata
set end_snap_id=2303
where dbid=4212607231
and dump_id=<most recent dump_id>;
commit;
If there isn’t any data at all, then force one upload and then edit it. This is easily done from the Console:
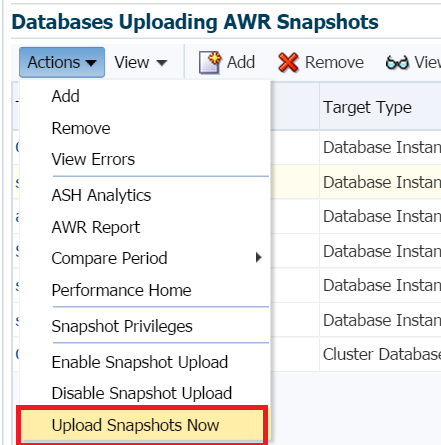
Proceed back and update the row in the metadata table and then check the UI to verify that the beginning and end snapshot looks correct. You should now have all the AWR data loaded back into the AWR Warehouse! And that’s, how to reload AWR Data from a database that must be removed and re-added to the AWR Warehouse.
This is a new process for me, so please, let me know if you note anything amiss and I’ll be glad to research it!
Pingback: Re-Adding a Database to the AWR Warehouse Without Losing Historical Snapshots - Oracle - Oracle - Toad World