
A DBA is only as good as their last backup…or more so, their last recovery.
To celebrate #WorldBackupDay on Twitter, I’m blogging on how to backup an Oracle database directly to Azure Blob storage. Yes, you could backup on a managed disk directly connected to the VM, then copy it off, but Azure Blob Storage is inexpensive and provides considerable speed and opportunity to create an NSF mount to use the backups with other Oracle hosts for cloning, recovery, etc.
Configure Blob Storage in the Azure Portal
In this example, we have an Oracle database running on an Azure IaaS VM and need to backup the database with RMAN. No RMAN repository catalog will be used, but yes, you can use one- no problem.
If you don’t already have a database and want to play along, you can perform the following blog post to create one.
Create blob storage that you want to use with the database, you can do this in the portal, go to Storage Accounts and click on +Add:
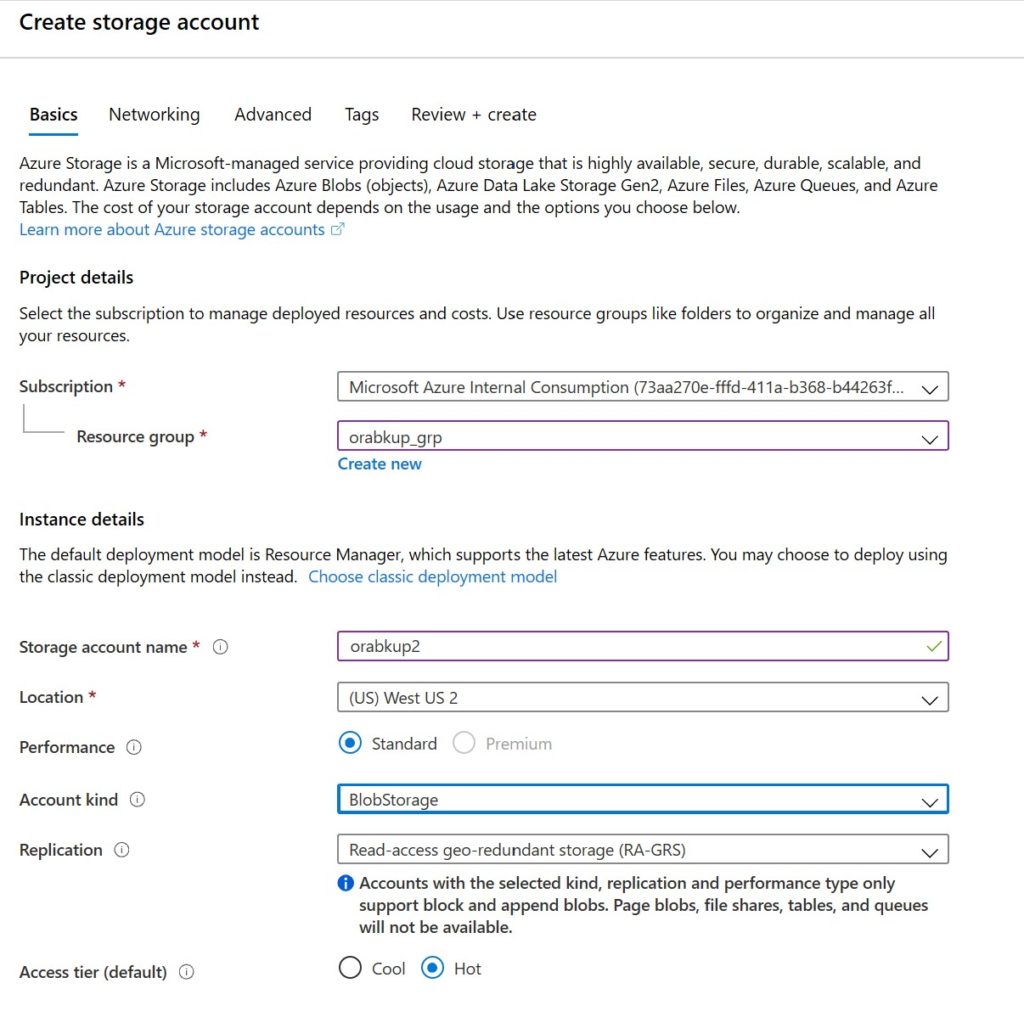
Click on Next and choose Public Endpoints and choose the defaults for the rest of the tabs and create.
Once created, go into the storage account and on the left blade, choose containers. Add a container, choosing a name that is descriptive and choose blob and anonymous read access. You’ll require this name later for your blobfuse creation.

Install BlobFuse on the VM Host
Once you have your Oracle VM and your storage set up, you need to get a clone for the Blob Fuse install. Follow these instructions to complete this step from the VM Host as Root.
For our new VM, Oracle Linux requires the same installation as RHEL:
sudo rpm -Uvh https://packages.microsoft.com/config/rhel/7/packages-microsoft-prod.rpm
Run the Install:
sudo yum install blobfuse
Create the directories and ensure the ownership is correct on the mount
sudo mkdir /mnt/blobfuse -p

mkdir /mnt/blobfuse/orabcntr1
sudo chown oracle /mnt/blobfuse/
You should now see your new mount point:
Next you need to create a configuration file that will contain the vital information for Blobfuse to log in. You can find the values in the Azure Portal -> Storage Accounts -> click your storage account -> Access keys. The container name is the name of the virtual folder that you’re mounting. This container should already have been created either on in the Azure Portal or the Azure Storage Explorer):
touch ~/connection.cfg

chmod 600 ~/connection.cfg
vi ~/connection.cfg
The file will contain three lines in it and look similar to the following:
accountName orabkup2
accountKey 5RD7lzbNJOABSC3/V6E3hsU1aXSRlksjdf8762lks7lksh39JKSINE-
containerName orabcntr1
Mount the storage to be used:
blobfuse mnt/blobfuse/orabcntr1 --tmp-path=/mnt/ramdisk/blobfusetmp --config-file=/fuse_connection.cfg -o attr_timeout=240 -o entry_timeout=240 -o negative_timeout=120 --config-file=../connection.cfg --log-level=LOG_DEBUG --file-cache-timeout-in-seconds=120
You can now view the mount point on the host:
df -h
blobfuse         30G   17G   11G  61% /mnt/blobfuse/orabcntr1

Test that you can write to the blob storage as Oracle:

su - oracle
cd /mnt/blobfuse/orabcntr1
mkdir test
echo "hello world" > test/blob.txt
RMAN Backup with Blob Storage
First step is to install Blob Fuse on the Linux VM to be used in conjunction with the blog storage by RMAN:
export ORACLE_HOME=/u01/app/oracle/product/18.0.0/dbhome_1
export ORACLE_SID=cdb1
RMAN
connect target /

CONFIGURE SNAPSHOT CONTROLFILE NAME TO '/mnt/blobfuse/orabcntr1/snapcf_ev.f';
CONFIGURE CHANNEL 1 DEVICE TYPE DISK CONNECT '*' FORMAT   '/mnt/blobfuse/orabcntr1/DB_NAME/%U';
new RMAN configuration parameters are successfully stored
CONFIGURE CHANNEL 2 DEVICE TYPE DISK CONNECT '*' FORMAT   '/mnt/blobfuse/orabcntr1/DB_NAME/%U';
new RMAN configuration parameters are successfully stored
If you do a the following:
SHOW ALL;
The following will be seen as part of the RMAN configuration:
CONFIGURE CHANNEL 2 DEVICE TYPE DISK CONNECT '*' FORMAT   '/mnt/blobfuse/orabcntr1/DB_NAME/%U';
CONFIGURE CHANNEL 1 DEVICE TYPE DISK CONNECT '*' FORMAT   '/mnt/blobfuse/orabcntr1/DB_NAME/%U';
CONFIGURE SNAPSHOT CONTROLFILE NAME TO '/mnt/blobfuse/orabcntr1/snapcf_ev.f';
Now run the backup:
run
 {
 BACKUP AS COMPRESSED BACKUPSET ARCHIVELOG ALL NOT BACKED UP FILESPERSET 10 DELETE ALL INPUT TAG ‘ARCH’;
 }

Once the backup has succeeded, you can then schedule backups of both the database + archive logs and regular archive logs to the blob storage in CRON.