
Tips and Tricks- Delphix Express
Delphix Express offers a virtual environment to work with all the cool features like data virtualization and data masking on just a workstation or even a laptop. The product has an immense offering, so no matter how hard Kyle, Adam and the other folks worked on this labor of love, there’s bound to be some manual configurations that are required to ensure you get the most from the product. This is where I thought I’d help and offer a virtual hug to go along with the virtual images…:)

If you’re already set on installing and working<– (Link here!!) with Delphix Express, you will find the following Vimeo videos- importing the VMs and configuring Delphix Express quite helpful. Adam Bowen did a great job with these videos to get you started, but below, I’ll go through some technical details a bit deeper to give folks added arsenal in case they’ve missed a step or challenged just starting out with VMWare.
Note- Delphix Express requires VMWare Fusion, which you can download after purchasing a license, ($79.99) but well worth the investment.
Resource Usage
Not enough memory to run all three VM’s required as part of Delphix Express or after an upgrade, the Delphix Express uses over 6Gb.
Different laptops/workstations have different amounts of memory, CPU and space available. Memory is the most common constraint with today’s pc. Although the VMs are configured for optimal performance, the target and source environments can have the memory trimmed to 2Gb each and still perform when resources are constrained.
The VM must be shut down for this configuration change to be implemented. After stopping or before starting the VM, click on Virtual Machine, Settings. Click on Processors and Memory and then you can configure the memory usage via a slider option as seen below:
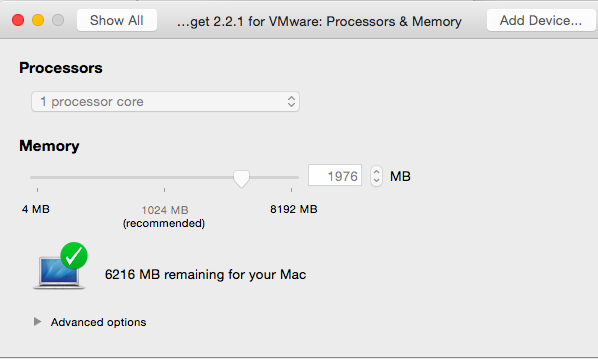
Move the slider to under 2G for the VM in question and then close the configuration window and start the VM. Perform this for each VM, (the Delphix Engine VM should already be at 2Gb.)
Configuration
Issue- Population of sources and targets is empty after successful configuration.
Checking the Log
After starting the target and source VMs, a UI interface with command line is opened and you can login right from the VMWare. Virtualbox would require a terminal opened to the desktop, but either way, you can get to the command line interface in such a way without using Putty or another desktop terminal from your workstation.
On the target VM command line, login as the delphix user. The target VM has a python script that runs in the background upon startup that checks for a delphix engine once every minute and if it locates one, will run the configuration. You can view this running in the cron:
crontab -l
@reboot ..... /home/delphix/landshark_setup.py
It writes to the following log file:
/home/delphix/landshark_setup.log
You can view this file, (or tail it or cat it, whatever you are comfortable doing to view the end of the file…) I prefer just to view the last ten lines, so I’ll run a command to look at JUST the last ten lines:
tail -10 landshark_setup.log
If the configuration is having issues locating the Delphix engine, it will show in this log file. Once confirmed, then we have a couple steps to check:
VMWare issue with the one of the virtual machines not visible to another. Each VM needs to be able to communicate and interact with each other. When importing in each VM, the ability for the VM to be “host aware” with the Mac may not have occurred. If you the delphix engine VM isn’t viewable to the target or the source, you can check the log and then verify in the following way.
Click on Virtual Machine, Settings and then click on Network Adapter. Verify that the top radio option is selected for “Share with my Mac”:
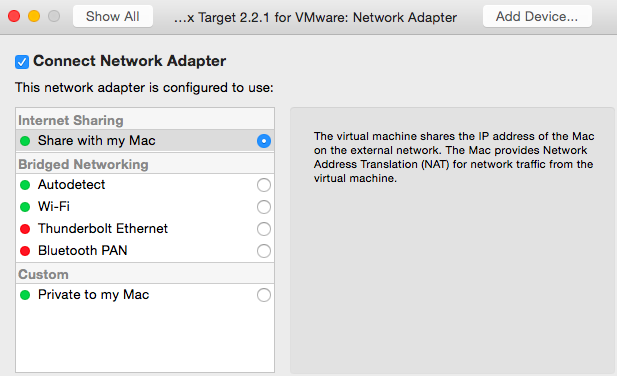
Verify that this is configured for EACH of the three virtual machines involved. If this hasn’t corrected and the configuration doesn’t populate the virtual environments in the Delphix interface, then it’s time to look at the configuration for the target machine.
Get IP Address
While SSH connected to the target machine, type in the following:
ifconfig
Use the IP address shown, (inet address) and open a browser on your PC, adding the port used for the target configuration file, (port 8000 by default):
<ipaddress>:8000
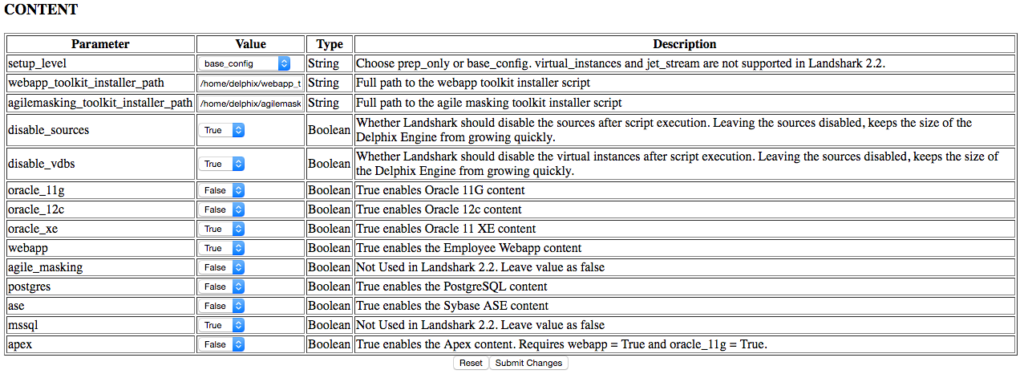
You should be shown the configuration file for your target server that is used to run the delphix engine configuration. There are options to update the values for different parameters. The you should focus on are:
Environments
linux_source_ip= make sure this matches the source VM’s ip address when you type in “ifconfig”.
Engine
engine_address= ip address for the delphix engine VM when you type in ifconfig on the host
engine_password= should match the password that you updated your delphix_admin to when you went through the configuration. Update it to match if it doesn’t, as I’ve seen some folks not set it to “landshark” as demonstrated in the videos, so of course, the setup will fail when the file doesn’t match the password set by the user.
Content
oracle_xe = If you set Oracle_xe to true, then don’t set the 11g or 12c to true. To conserver workstation resources, choose only one database type.
Once you’re made all the changes you want to the page, click on Submit Changes.
You need to run the reconfiguration manually now. Remember, this runs in the background each minute, but when it does that, you can’t see what’s going on, so I recommend killing the running process and running it manually.
Manual Runs of the Landshark Setup
From the target host, type in the following:
ps -ef | grep landshark_setup
Kill the running processes:
killall landshark_setup.py
Check for any running processes, just to be safe:
ps -ef | grep landshark_setup
Once you’ve confirmed that none are running, let’s run the script manually from the delphix user home:
./landshark_setup.py
Verify that the configuration runs, monitoring as it steps through each step:
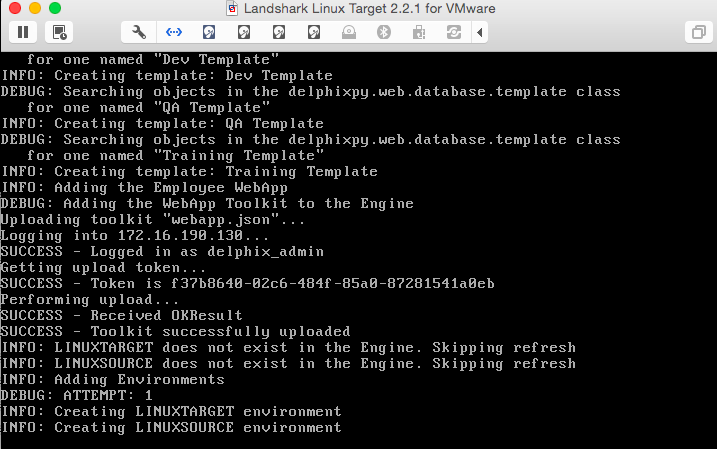
This is the first time you’re performed these steps, so expect a refresh won’t be performed, but a creation will. You should now see the left panel of your Delphix Engine UI populated:
Now we’ve come to the completion of the initial configuration. In my next post on Delphix Express, I’ll discuss the Dsource and Target database configurations for different target types. Working with these files and configurations are great practice to learning about Delphix, even if your Delphix Express even if you are amazed at how easy this all was.
If you want to see more about Delphix Express, check the following links from Kyle Hailey or our very own Oracle Alchemist guy, Steve Karam….:)

If you run Windows you also have the option of downloading Oracle VM VirtualBox (free) and downloading the Delphix Express images for that!
Insanely easy setup & install – then hit the points Kellyn has here and you will be off to the races!
You can actually run Virtualbox on either Mac or Windows with DelphixExpress. If you do use Windows, and want an easier setup, you can use VMware Workstation (~$99.00)
Awesome job. Thanks, Kellyn.
Apologies, I should have worded that better! Yes, of course you can use Oracle Virtualbox, too, but you do need a VM management tool for Delphix Express, either VMWare or Oracle Virtualbox. Thanks guys! 🙂