

Microsoft has done a great job of documenting how to create a VM with the appropriate VM image and Oracle version, then how to log in, startup the listener and create the database. I just have some enhancements I’d like to make to it, hoping to help it move up one level.
I Bequeath to You
All instructions provided by the Microsoft documentation show how to connect to the database using a bequeath, (BEQ) connection. This is done by the following command, using SQL Plus, (or similar):
sqlplus / as sysdba
It bypasses the need for a connection string, only requiring the SID to be set at the environment level:
export ORACLE_SID=<sid name>
This information, for Oracle DBAs, is often gathered from a running database server executing the following command:
ps -ef | grep pmon
For the standard database user, accessing an Oracle database in a standard capacity, the connection is performed via TNS, (Transparent Network Substrate). This requires a running Oracle listener to listen for incoming connections, then connecting to information stored in the sqlnet.ora and the tnsnames.ora files. There are a couple of additional steps that either an Oracle DBA without Azure experience may not know or an Azure specialist without Oracle experience might miss that I’m going to document to make it easier, which can result in a chicken before the egg challenge that we’ll take on in this blog post.
Using the documentation and performing the steps to create the VM, but stopping at the “Create the Database” step, (no logging into the VM, su over to the Oracle user and starting the listener.) Instead, lets log into the Azure Portal and go to the VM you’ve just created.
Why do you want to go to the portal instead of starting the listener, (and if you’ve started the listener, why do you want to shut it back down and go to the portal)?
If you do log into the VM and start the listener, you could verify the name of the host that is set by default as part of the VM creation by querying the status of the running listener:

Host=oracledb2.qzvde3m5s4y….. what?? cx.internal.cloudapp.net? Aw, hell no.
Not the best of names and not something you want to have for any length of time if you want to try to connect with TNS. So you may be asking how to fix this as an Oracle DBA?
Configure DNS in Azure
Although there is a way to do this as part of the azure VM creation, if you’re following the directions, it wouldn’t have occurred, so let’s log into the portal and address the DNS issue.
- Go to the Azure Portal and login.
- Go to the Resource group where the VM was deployed to.
- Click on the VM from the list.
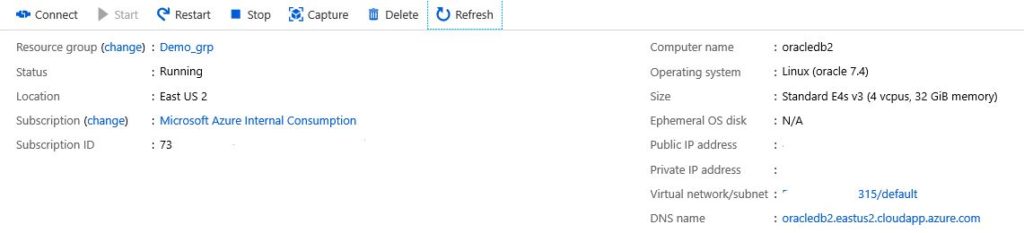
In the top section of the overview, last one on the right hand side, along with pertinent information about the VM, Private and Public IP Address, you’ll also see the option to configure the DNS Name:

Click on Configure and then you’ll be taken to the page to configure it.
Again, make sure your Listener is shut down, as it relies on the updates we’re making to understand it’s “location”, so this will save you from having to run a kill command on the Listener PID for force it to shutdown.
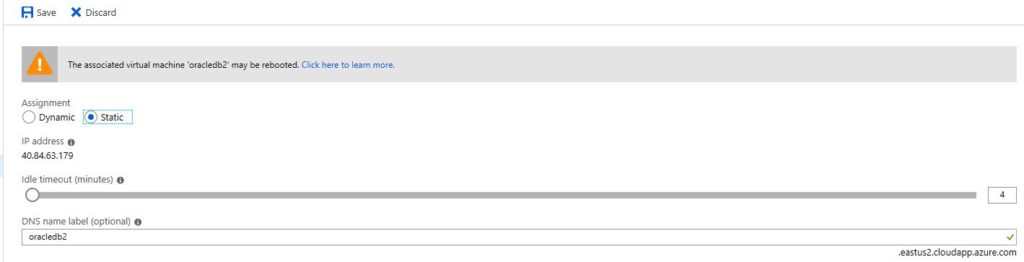
- Change the IP Address to STATIC- yes, this will require a reboot of the VM, that’s alright.
- Add the short name of the host, in this case, oracledb2. Note: the long name for our example will be oracledb2.eastus2.cloudapp.azure.com.
- Click on Save and restart the VM to update the new settings if required.
- Log back in and verify everything.
The portal will now look similar to the following, (although you will have a private and public IP address showing, along with the DNS Name):
Verify the Linux Host
Go back to your ssh terminal, log into the VM and check the host name by typing in the following command :
uname -a
Now let’s configure the /etc/hosts file with the new information. This must be done as the server admin login you use to ssh into the host. It has the sudo privileges needed to perform these steps:
sudo vi /etc/hosts
You should see the following entries:
127.0.0.1   localhost localhost.localdomain localhost4 localhost4.localdomain4
::1         localhost localhost.localdomain localhost6 localhost6.localdomain6
Append the following information on a new line to the file:
<IP Address> <Shortname> <LongName>
Example:
40.17.124.235 oracledb2 oracledb2.eastus2.cloudapp.azure.com
Save the file, (ESC, :wq) and SU, (switch user) to Oracle.
- Start the listener.
- Note the host name change:
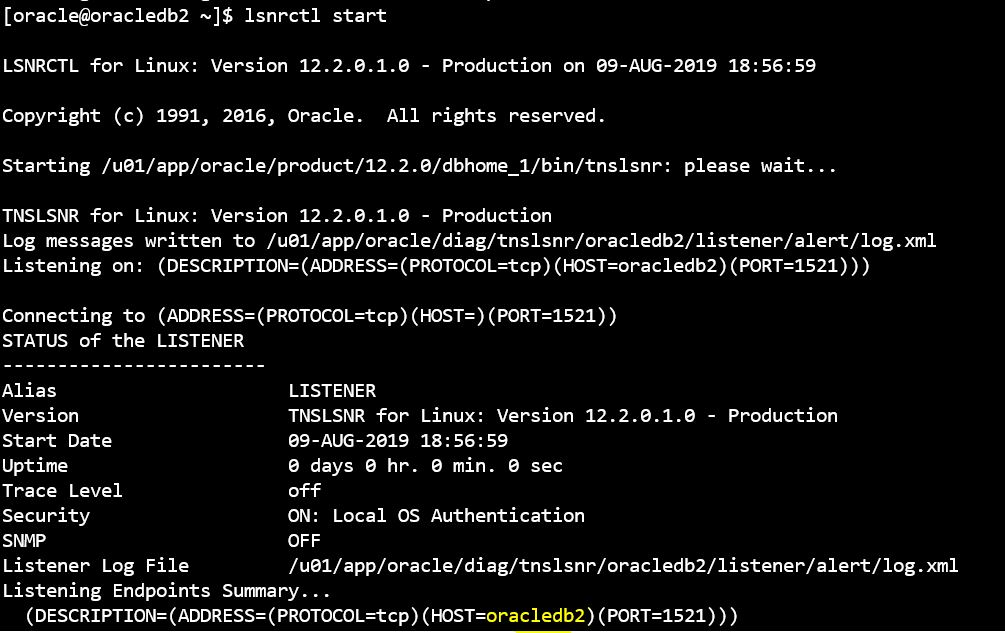
Much better!!
Now follow the directions in the documentation to create the database with DBCA, (the Database Configuration Assistant)
Once you’ve completed all the steps from the documentation, we can then return to complete the TNS configuration.
TNS Setup
then proceed to setting up the TNS connection.
- SU over to the Oracle user.
- CD to $ORACLE_HOME/network/admin
- We’re going to create two new files to support TNS connections.
vi tnsnames.ora
Format of the entry, placing you alias/database/host shortname in where appropriate:
<alias> =
 (DESCRIPTION =
  (ADDRESS_LIST =
   (ADDRESS = (PROTOCOL = TCP)(HOST = <host shortname>)(PORT = 1521))
  )
  (CONNECT_DATA =
   (SERVICE_NAME = <database service name>)
  )
 )
Once finished, type in :wq to write to the file and quit.
Let’s say you don’t know what the service name is for your database, (again for those Azure folks that are just starting to acclimate to Oracle…) There’s a few different ways to do this. You can use hour bequeath login to verify:
sqlplus / as sysdba
SQL> select name from dba_services
  2  where name not in ('SYS$BACKGROUND','SYS$USERS')
  3  and name not like '%XDB';
OR gather the info from the listener:
lsnrctl services
Both of these actions must be performed as the ORACLE user and the first one requires the ORACLE_SID to be set for the syntax used.
Now let’s create the sqlnet.ora file:
vi sqlnet.ora
Format of the entry:
NAMES.DIRECTORY_PATH= (TNSNAMES)
Again, type in :wq to write and quit when completed.
This tells the listener to use TNS as it’s choice to connect. There are numerous other options for connections, but I haven’t included them in this post. Let’s test our connection now:
sqlplus <username>@<alias>
Enter in the password for the user and you should connect.
- If you receive a 12154, check the names in your TNS alias to the one you used.
- A 12170, check the services that are listed vs. what you put in the TNS file.
Now your Oracle VM is set up to support basic TNS connections to the Listener. If there are more advanced connections security setup, such as Kerberos, then this will have to be installed and configured on the Linux VM, but that’s a post for another day.
I’m headed out this week to speak at NoCOUG, (Northern California Oracle User Group) on Thursday and will then be heading to Louisiana to speak at SQL Saturday Baton Rouge this weekend. Looking forward to seeing everyone at both these events and customers inbetween!


One comment on “Azure VMs with Oracle- Next Steps”
Comments are closed.